

Homemade Canned Strawberries
Homemade Canned Strawberries: A Sweet Preserve to Brighten Your Day
If you’re anything like me, the thought of savoring sweet, juicy strawberries during the off-season comes with a hint of nostalgia. Homemade canned strawberries not only allow you to relish the flavors of summer all year round, but they also transform the simplest ingredients into pure magic. Picture this: breakfast pancakes topped with vibrant strawberry syrup, or a cozy dessert that makes your heart skip a beat. Let’s dive into this delightful recipe that’ll have you channeling your inner canner in no time!
Why You’ll Love This Homemade Canned Strawberries Recipe
Let’s be honest – life is busy! Between juggling work, family, and the occasional Netflix binge (hey, we all need our me-time), who has time to deal with grocery store produce that’s hit-or-miss? By making your own canned strawberries, you’re taking control of those luscious flavors while also creating something special to share. Plus, there’s something undeniably satisfying about cracking open a jar of summer sun in the middle of winter.
Ingredients You’ll Need
Before we roll up our sleeves and get our hands a little sticky, let’s gather the essentials for our homemade canned strawberries:
- 2 quarts of fresh, ripe strawberries (about 4-5 pints)
- 1 cup of granulated sugar (or adjust based on your sweetness preference)
- 4 cups of water
- 1/4 cup of lemon juice (freshly squeezed is best!)
- Canning jars and lids (homemade gifts incoming!)
Step-by-Step Guide to Canning Strawberries
Canning might sound intimidating, but I promise you it’s not rocket science. Here’s a simple breakdown of how you can preserve those beauties:
-
Prepare the Strawberries: Start by washing your strawberries thoroughly under running water. Remove the stems and slice them if you prefer (or leave them whole for that rustic look).
-
Make the Syrup: In a large pot, combine the water and granulated sugar over medium heat. Stir until the sugar dissolves completely. Bring this mixture to a gentle simmer – the sweet syrup will make your kitchen smell like a strawberry carnival!
-
Add the Lemon Juice: Once your syrup is simmering, it’s time to add the lemon juice. This brightens the flavor and helps preserve the stunning color of our strawberries.
-
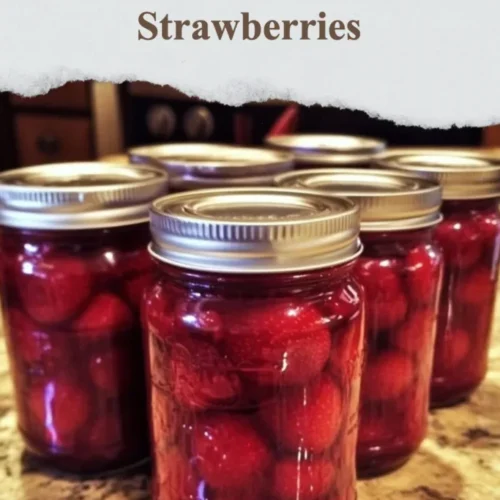
Pack the Jars: Using sterilized jars (you can toss them in boiling water for a few minutes for this step), carefully pack the strawberries into each jar. Fill them to just below the rim, adding more if needed for those who like an extra strawberry punch!
-
Pour in the Syrup: Ladle the hot syrup over the strawberries, leaving about a half-inch of space at the top. You want them nestled in their sweet bath, but not drowning, so to speak.
-
Seal and Process: Wipe the rims of the jars to ensure a good seal, then place the lids on top. Process them in a boiling water bath for about 10 minutes. This will help preserve those bright flavors and ensure your homemade canned strawberries last longer.
-
Cool and Store: Once done, remove the jars from the hot water and let them cool completely on a clean kitchen towel. You’ll hear that satisfying “pop” as they seal – music to a canner’s ears! Store them in a cool, dark place, and they’ll be ready for you whenever you crave a taste of summer.
Cooking Tips
- Strawberry Selection: When choosing strawberries, go for the ones that are firm, bright red, and fragrant. Avoid any that have soft spots; nobody wants a batch that’s over-the-hill!
- Adjusting Sweetness: If you prefer a less sweet taste, feel free to scale back on the sugar. Your strawberry-loving taste buds will thank you for customizing it to your liking!
- Don’t Fear the Water Bath: This step is essentially a warm embrace for your jars to preserve that strawberry goodness, so don’t worry – it will turn out delicious!
Personal Anecdote
I remember the first time I tried canning strawberries. My sister Patricia and I spent an entire weekend making a mess of the kitchen, all while laughing about our first attempts. Let’s just say, there was more syrup on the counter than in the jars! Still, it turned into a cherished memory and brought us closer as we bonded over pudding cups of strawberry goodness later. Creating these jars of sunshine is more than just a recipe; it’s about making memories that last a lifetime.
FAQ Section
Can I substitute any ingredients in this recipe?
Absolutely! If you’re looking for a sugar substitute, honey or agave can work as long as they’re proportional to sweetness. Just keep the syrup basics intact.
How do I store leftover jars if I don’t finish them?
Once you’ve canned your strawberries, they can last up to a year if stored properly in a cool, dark place. After opening a jar, transfer any leftovers to the fridge and enjoy within 1-2 weeks.
Are canned strawberries nutritious?
Yes! The process locks in nutrients and flavors, giving you a burst of those fabulous benefits. Just remember to add them to wholesome meals instead of indulging straight from the jar (but who am I to judge?).
As you embark on your canning adventure with Homemade Canned Strawberries, think about the delightful possibilities. From using them in breakfast recipes like pancakes and yogurt to making dessert toppings that dazzle, the sky’s the limit.
So grab your apron and channel your inner chef! Not only will you be relishing the delightful taste of summer at any time, but you’ll also bring a dash of creativity and joy to your kitchen. Happy canning!
Meta Description: Homemade canned strawberries are the perfect recipe for preserving summer flavors. Quick, easy, and delicious, this treat will delight you all year!
Homemade Canned Strawberries
Ingredients
Strawberry Canning Ingredients
- 2 quarts 2 quarts of fresh, ripe strawberries (about 4-5 pints) Choose firm, bright red strawberries.
- 1 cup 1 cup of granulated sugar (or adjust based on your sweetness preference) Adjust sweetness to taste.
- 4 cups 4 cups of water Used to create syrup.
- 1/4 cup 1/4 cup of lemon juice (freshly squeezed is best!) Helps preserve color and flavor.
- Canning jars and lids Sterilized jars are recommended.
Instructions
Preparation
- Wash the strawberries thoroughly under running water. Remove the stems and slice them if preferred.
Making the Syrup
- In a large pot, combine the water and granulated sugar over medium heat. Stir until the sugar dissolves completely and bring to a gentle simmer.
- Add the lemon juice to the syrup and stir.
Canning
- Using sterilized jars, carefully pack the strawberries into each jar, filling them to just below the rim.
- Ladle the hot syrup over the strawberries, leaving about a half-inch of space at the top.
- Wipe the rims of the jars for a good seal and place the lids on top.
- Process the jars in a boiling water bath for about 10 minutes.
Cooling and Storage
- Remove the jars from the hot water and let them cool completely on a kitchen towel.
- Store in a cool, dark place and enjoy whenever you crave a taste of summer!