
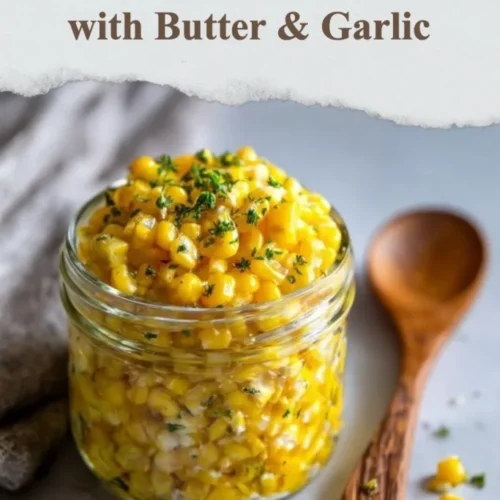
The Best Canned Corn with Butter & Garlic
The Best Canned Corn with Butter & Garlic: A Quick Delight for Any Table
If you think canned corn is just a boring side dish, think again! Today, we’re diving into The Best Canned Corn with Butter & Garlic, a recipe so simple yet so delicious that it’ll make you reconsider your pantry staples. This dish combines the sweet crunch of corn with the rich flavors of butter and garlic. Perfect for busy weeknights or when you need a little extra comfort on your plate, this recipe will quickly become your go-to solution. Let’s bring some flavor to those cans!
Why You’ll Love This Canned Corn Recipe
Let’s be real: life gets busy. Between juggling work, family, and everything in between, sometimes you need a go-to side dish that’s quick, easy, and absolutely scrumptious. The Best Canned Corn with Butter & Garlic fits the bill perfectly. It’s light but bursting with flavor, making it suitable for any gathering or just a cozy family dinner. Plus, it takes just a few minutes in the kitchen so you won’t miss out on precious time.
Ingredients
Grab your shopping list (or just look in your pantry) because here’s what you need:
- 2 cans of sweet corn (drained – make sure to save the planet, friends!)
- 2 tablespoons of butter (because everything’s better with butter)
- 2 cloves of garlic (minced; fresh or if you have to, use the jarred stuff)
- Salt and pepper to taste
- A sprinkle of parsley or chives for that professional touch (optional, but who doesn’t want to feel fancy?)
Steps to Culinary Glory
-
The Melting Symphony: In a medium-sized skillet, melt the butter over medium heat. Patience, my friend—this isn’t a race! Enjoy the aroma as it starts to bubble.
-
Garlic Awesomeness: Once the butter is melted, add the minced garlic. Cook for about 1-2 minutes until it’s fragrant, but be careful not to let it burn—burnt garlic smells like your worst nightmare.
-
Canned Corn, Assemble!: Pour in the drained corn and give it a good stir to coat all those lovely kernels in that buttery garlic goodness.
-
Spice It Up: Sprinkle a bit of salt and pepper to taste. Feel free to get a little adventurous here—add extra garlic if that’s your jam.
-
Heat Things Up: Let the corn cook for about 4-5 minutes, stirring occasionally. You want it heated through and perhaps a tad golden—this is the moment where magic happens!
-
Finishing Touches: Once the corn is ready, you can sprinkle some parsley or chives on top. This is completely optional but let’s be honest, it’s nice to impress with a pop of color and a wow factor!
And there you have it—The Best Canned Corn with Butter & Garlic is all ready to serve! It’s quick, unbelievably easy, and oh-so-comforting.
Cooking Tips That’ll Make You a Wizard
-
Leftover superheroes: If you’ve got any leftovers (which is not guaranteed because it’s that good!), store them in an airtight container in your fridge. Reheat on the stovetop for a few minutes with a splash of water to keep things fresh.
-
Adding flair: Feeling adventurous? Try adding a dash of cayenne pepper for a little kick or some grated cheese for creaminess—don’t be afraid to let your inner chef loose!
-
Picky eaters: If you’re serving little ones who might turn their noses up at veggies, this recipe is a sneaky way to add some benefits without the fuss. Just make it a little sweeter by adding a bit of honey while cooking!
Frequently Asked Questions
Can I use frozen corn instead of canned?
Absolutely! Just cook the frozen corn in the skillet until it’s heated through. You might need extra butter if it’s a bit dry.
How can I store leftovers?
Store leftovers in an airtight container in the fridge for up to 3 days. Just reheat on low to keep them tender.
What can I serve with this?
This delightful dish pairs wonderfully with grilled chicken, fish, or even on top of tacos for a twist!
If you’re craving more delectable ideas to make your meals shine, check out my easy family dinner recipes or explore the world of one-pan wonders.
With The Best Canned Corn with Butter & Garlic, you’re not just feeding your family; you’re bringing a little joy to the table. I hope it creates some smiles and warm memories in your home, just like it does in mine. So, savor every buttery bite, and relish in the simplicity of a dish that can elevate even the busiest of nights. Happy cooking, friends!
(P.S. If you’ve connected with this recipe, don’t forget to share your thoughts in the comments below!)
Meta Description: The Best Canned Corn with Butter & Garlic is quick, easy, and delicious. Elevate your mealtime with a simple dish everyone enjoys!
Ready to transform your meals? Let’s get those aprons on, and who knows—this might just become a staple in your cooking adventures!
Canned Corn with Butter & Garlic
Ingredients
Main Ingredients
- 2 cans sweet corn drained
- 2 tablespoons butter for a rich flavor
- 2 cloves garlic minced; fresh or jarred
- to taste salt for seasoning
- to taste pepper for seasoning
- optional parsley or chives for garnish
Instructions
Cooking Steps
- In a medium-sized skillet, melt the butter over medium heat.
- Once the butter is melted, add the minced garlic and cook for about 1-2 minutes until fragrant.
- Pour in the drained corn and stir to coat all the kernels in the buttery garlic goodness.
- Sprinkle a bit of salt and pepper to taste.
- Let the corn cook for about 4-5 minutes, stirring occasionally until heated through and slightly golden.
- Sprinkle parsley or chives on top before serving, if desired.