Meta description: Apple Crisp Mini Cheesecakes: the perfect fall dessert for busy moms—easy, quick, and crowd-pleasing. Make ahead bites full of warm apple spice. Enjoy
Apple Crisp Mini Cheesecakes — Little Fall Desserts for Busy Days
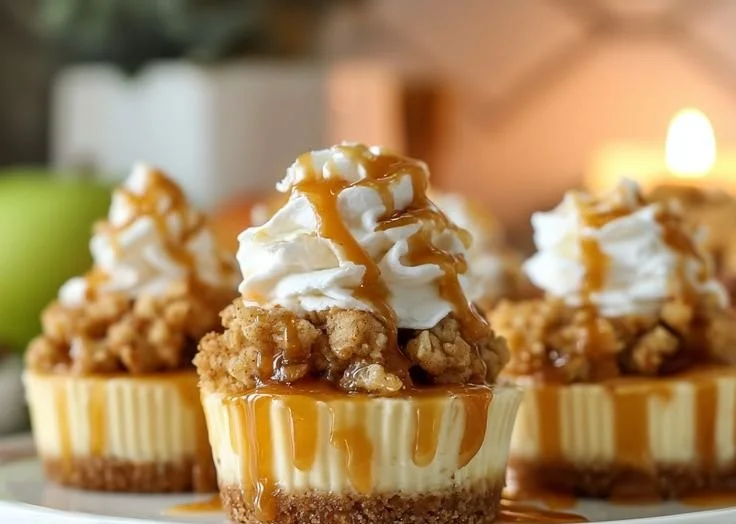
If you love cozy fall flavors but don’t have time to babysit a giant cake, these Apple Crisp Mini Cheesecakes are your new best friend. Apple Crisp Mini Cheesecakes pack all the warm cinnamon-apple goodness of a classic apple crisp into a bite-sized mini cheesecake—perfect for busy weeknights, potlucks, or when you want to impress guests without breaking a sweat.
I’m Anna (hi!), and my sister Patricia and I are always trying to turn comforting flavors into something a little more convenient. These mini cheesecakes are exactly that: a sweet, approachable fall dessert that makes your kitchen smell like a hug. Read on for a recipe that’s kind to your schedule, friendly to picky eaters, and just festive enough for holiday gatherings.
Why You’ll Love These Apple Crisp Mini Cheesecakes
- They’re mini—no guilt, just joy. Ideal for moms juggling schedules, hosts who want finger-food desserts, or anyone who likes their desserts perfectly portioned.
- Make-ahead friendly: assemble in advance, chill, and serve when needed.
- Crowd-pleasing fall dessert flavors: cinnamon, tart apple, brown sugar, crunchy oat crumble, and a creamy cheesecake center.
- Versatile: serve warm with a scoop of vanilla ice cream, or chilled with a dollop of whipped cream.
If you’re short on time, this recipe will feel like a tiny victory. If you love hosting but hate the clean-up, these little delights are single-bite magic.
Ingredients
Makes about 24 mini cheesecakes (2-inch muffin tin)
Crust & crumble:
- 1 1/2 cups rolled oats
- 3/4 cup all-purpose flour
- 1/2 cup brown sugar, packed
- 1/2 teaspoon salt
- 1 teaspoon ground cinnamon
- 1/2 cup (1 stick) unsalted butter, melted
Apple filling:
- 2 medium apples (Granny Smith or Honeycrisp), peeled and finely diced
- 2 tablespoons butter
- 2 tablespoons brown sugar
- 1/2 teaspoon ground cinnamon
- 1/8 teaspoon ground nutmeg
- 1 tablespoon lemon juice
Cheesecake filling:
- 16 oz (450 g) cream cheese, room temperature
- 1/2 cup granulated sugar
- 2 large eggs
- 1 teaspoon vanilla extract
- 1/3 cup sour cream or Greek yogurt (for tang and creaminess)
Optional garnish:
- Whipped cream or a scoop of vanilla ice cream
- A small dusting of cinnamon or a caramel drizzle
Notes:
- For a gluten-free version, swap the flour for gluten-free 1:1 flour and confirm oats are certified gluten-free.
- The apples can be swapped for pears in a pinch for a slightly milder flavor.
Equipment
- 24-cup mini muffin tin or 2-inch cookie cutter and baking sheet
- Mixing bowls
- Electric mixer or sturdy whisk
- Small saucepan for apples
- Measuring cups and spoons
Step-by-step Directions
-
Preheat and prep. Preheat your oven to 350°F (175°C). Line a 24-cup mini muffin tin with paper liners or lightly grease each cavity with nonstick spray.
-
Make the crust-crumble base. In a bowl, stir together the oats, flour, brown sugar, salt, and cinnamon. Pour in the melted butter and toss until the mixture is evenly moistened and crumbly. Press about 1 tablespoon of this oat mixture into each mini muffin cup to form a compact base and a little rim (reserve about 1/3 cup of the crumble to bake on top later).
-
Cook the apples. In a small saucepan over medium heat, melt 2 tablespoons butter. Add the diced apples, brown sugar, cinnamon, nutmeg, and lemon juice. Cook, stirring occasionally, until the apples are just tender (4–6 minutes). You want them softened but not mushy. Remove from heat and let cool slightly.
-
Make the cheesecake filling. In a mixing bowl, beat the room-temperature cream cheese until smooth and creamy (about 1–2 minutes). Add granulated sugar and beat until combined. Add the eggs one at a time, mixing well after each. Stir in the vanilla and sour cream or Greek yogurt until smooth. Don’t overbeat; a few small air bubbles are fine.
-
Assemble. Spoon about 1 tablespoon of cheesecake filling over each oat crust. Top each with a small spoonful (about 1 tsp) of the cooked apple mixture. Sprinkle a pinch of the reserved oat crumble on each mini cheesecake for that apple-crisp finish.
-
Bake. Bake in the preheated oven for 14–18 minutes, or until the cheesecake centers are mostly set but still slightly wobbly. Be careful not to overbake—mini cheesecakes finish setting as they cool.
-
Cool and chill. Let the mini cheesecakes cool to room temperature in the pan for 30 minutes, then transfer to the fridge for at least 2 hours (overnight is better) to firm up.
-
Serve. Peel away the liners (or pop them out if greased) and garnish with whipped cream, a dusting of cinnamon, or a drizzle of caramel. Serve chilled or at room temperature. If you like warm apple crisp vibes, pop a few on a baking sheet and heat at 300°F for 5–7 minutes before serving with ice cream.
Tip: If you want a sturdier crust, press it a little higher on the sides of the mini cups so each bite gets a nice crumbly edge.
Quick Timeline (for busy cooks)
- Prep and bake apple filling: 10 minutes
- Make crust and filling: 15 minutes
- Assembly and bake: 20 minutes
- Chill time: 2+ hours (or overnight)
Total active time: ~45 minutes. Total time including chilling: ~3 hours.
Cooking Tips & Tricks
- Room temperature cream cheese mixes more smoothly. If you forget to take it out, microwave in 7–10 second bursts until slightly softened; don’t melt it.
- Want to make these ahead? Assemble completely and store in an airtight container in the fridge for up to 3 days, or freeze for up to 1 month (see FAQs for thawing tips).
- For a crispier crumble, broil the reserved oat mixture on a baking sheet for 5 minutes and cool before sprinkling on top.
- Don’t overcook the apples. They should hold some texture so each bite has that lovely contrast between creamy and fruity.
- If mini cheesecakes crack a bit on top, no worries—cover with a dollop of whipped cream and nobody will know (or care).
A Little Kitchen Story
Patricia and I tested these on a rainy afternoon when the kids were home and the Wi-Fi briefly decided it liked being dramatic. We started with a full-size cheesecake and promptly decided tiny was better—less guilt, more variety. The kids voted by taste-test (one apple lover, one cookie monster), and we ended up putting out a platter that vanished in under 10 minutes. If your crew is anything like ours, these will disappear fast—so hide a couple for yourself.
FAQs
Q: Can I substitute low-fat cream cheese or Greek yogurt?
A: You can swap in lower-fat options, but expect a slightly less rich texture. Using full-fat cream cheese gives the most classic creamy mini cheesecake. Greek yogurt can replace sour cream in the filling for a brighter tang.
Q: Can I make these gluten-free?
A: Yes—use certified gluten-free oats and swap the all-purpose flour for a gluten-free 1:1 baking flour. The texture will be slightly different but still delicious.
Q: How long do leftovers keep?
A: Store assembled mini cheesecakes in an airtight container in the refrigerator for up to 3 days. For longer storage, freeze them (see below).
Q: Can I freeze them?
A: Freeze fully cooled cheesecakes on a tray until solid, then transfer to a freezer bag for up to 1 month. Thaw overnight in the refrigerator before serving. If you’d like to serve warm, reheat in a 300°F oven for 8–10 minutes.
Q: What apples work best?
A: Granny Smiths give a bright, tart contrast to the sweet crumble; Honeycrisp or Fuji offer more sweetness and hold their shape nicely.
Q: Can I make them dairy-free?
A: For a dairy-free version, use plant-based cream cheese and a vegan butter alternative in the crust. Texture and flavor will vary, but it’s doable.
Serving Suggestions & Variations
- Party dessert idea: Arrange a platter of mini cheesecakes with assorted toppings—caramel sauce, chopped pecans, maple whipped cream—so guests can customize.
- Fall twist: Add 1 tablespoon of maple syrup to the apple filling for a maple-apple flavor.
- Boozy option: Add 1 tablespoon of bourbon or spiced rum to the apple mixture while cooking for adults-only gatherings.
- Pear version: Swap apples for diced pears and a pinch of ginger for a softer, fragrant dessert.
If you’d like more ideas for easy desserts and weeknight comfort food, check out my collection of simple desserts and family dinners—I love sharing recipes that fit real life. You can also read a bit more about my cooking journey and why Patricia and I cook what we do on our About page.
Internal links for more inspiration:
- For a hearty weeknight idea that’s as easy as this dessert, try our easy weeknight dinners (https://al3ab.tech/easy-weeknight-dinners).
- If you want a classic to compare textures, our classic cheesecake recipe shows full-size technique and tips (https://al3ab.tech/classic-cheesecake-recipe).
- Curious about other apple-forward recipes? Browse our apple recipes roundup (https://al3ab.tech/apple-recipes).
Nutrition Snapshot (approximate per mini cheesecake)
- Calories: 150–190
- Fat: 9–12g
- Carbs: 14–18g
- Protein: 2–3g
(Nutritional values depend on exact ingredients and portion sizes.)
Final Notes
These Apple Crisp Mini Cheesecakes are a small investment of time for a big return: they look special, taste comforting, and handle the chaos of everyday life beautifully. Whether you’re baking for after-school snack duty, a book club, or a holiday table, this recipe scales and adapts. And if you find yourself making them as often as Patricia and I do, that’s exactly the plan.
Conclusion
If you want a reference for a similar take or a different method for assembly, I found two helpful recipes that inspired parts of this approach: Apple Crisp Mini Cheesecakes – OMG Chocolate Desserts and Mini Apple Crisp Cheesecakes (Easy Fall Dessert Recipe) – My Incredible Recipes. Give this recipe a try, tuck a few in the freezer for emergencies, and let the small victories keep you smiling in the kitchen.
Happy baking — and if you make these, tag us or leave a comment; nothing makes our day like hearing your kitchen stories.